Friday, November 25, 2011

Upgrading to Ubuntu 11.10

We decided to upgrade the HP compaq 8510p laptop to the latest desktop and then to add the server stuff we need (LAMP, various lamp apps, etc). The old 80gig hard drives were too small and we were running ver 9.x which did not support the wireless. So we replaced the hard drive with a new 500gig Seagate hybrid hard drive (SSD/SATA) that should be a lot faster.

Installing was quick and it did fix the wireless problem. However, there are a number of issues with the new release (some minor, some major)

  • The Unity interface is annoying (slower to find what you want)
  • Windowshade is not longer an option for windows
  • Synaptic package manager is not longer included
The first issue was to switch back to Gnome.  First we installed it by entering the terminal and doing:

   sudo apt-get install gnome-shell

and then restarting and logging in again. This provides some login option. First time around we choose Gnome but the screen menus were scrambled and the unity right side dock would appear!  Logging out and choose Gnome Classic at login solved that problem. I can't figure out to how to get windows to roll up, a feature i've been using since mac os 7 and one that is much more usable than having to minimize windows in the way and then go all the way down to the bottom bar to retrieve them. I also seem to recall Unity had that annoying Windows 7 behavior that when you move a window to the side of the screen it maximizes the window. What dumb idea, you move windows to the side to get them out of the way because you can't roll them up. It is fast to just throw a window to the side, doing that does NOT mean i now want it to take up the whole screen. Dumb usability ideas - don't they test these things with real users?

The next step is to download and install all my regular apps and then install LAMP. I did this many versions ago using TASKSEL and the results were awful - lots of problems. So i have to decide between 3 install methods:

Method 1 - TASKSEL(easy but does it work better now?)

sudo apt-get install tasksel
sudo  tasksel
select LAMP Server

Method 2 - Manually (more work to install but possibly most stable?)

sudo apt-get install apache2
sudo apt-get install mysql-server
sudo apt-get install php5 libapache2-mod-php5 php5-mysql
sudo /etc/init.d/apache2 restart
sudo apt-get install phpmyadmin

Method 3 - 'Bundle' method (newer so maybe give it a whirl?)

sudo apt-get install lamp-server

Of course I have yet to find an informed article that can discuss the pros/cons of the 3 approaches. So it is trial and error.

On the plus side, the laptop is very snappy. Next to get back my apps... Ah good, the Ubuntu software center has synaptic so let's start with that...

PS - one new app that is interesting is under Internet, Desktop Sharing. We will be trying this out as we need to find a good way to showing distance ed students how to do particular tasks. We having been taking screen shots and turning them into movies using Camtasia Studio but that is proprietary and you have to update them when things change. I'd like to be able to stream my desktop to 1 or more students so they can see a process and ask questions.

Friday, November 11, 2011

Lucicat eBook Server

We downloaded the .zip file from http://lucidor.org/lucicat/ and unzipped them into a lucicat folder in the root of the web site.

Next we opened lucicat.ini in a text editor and set the following settings:

db_type: mysql
db_host: localhost
db_name: lucicat
db_user: lucicat
db_password: lucicat
db_prefix: luci_

We then go to the phpMyAdmin page and create the blank lucicat database and a user called lucicat with a password of lucicat who has all privileges on that database on localhost.

Next we edit lucicat/server/lucicat_settings.php and set the following:

$db_addr = 'localhost';
$db_name='lucicat';
$db_user='lucicat';
$db_password='lucicat';

Next we have to figure out how to set the catalog but i can't seem to load the manual into Calibre.

Tomorrow

Read manual and create a catalog


Thursday, October 27, 2011

Adding MARC Records to Koha


Now that the laptop is running fine we decide to add some records to our system. We have a number of downloaded MARC records from various sources such as the library of congress, weldon library, in batches of 25, 50, 500, 2000 etc for testing.  All files have an extension of .MRC

To batch load records

Log in to the staff menu (http://localhost/kohaadmin)

  1. Select Tools, Stage MARC records for import
  2. Click Browse
  3. Select a .mrc file
  4. Click Upload File
  5. Click Stage for Import
  6. Click Manage Staged Records
  7. Click Import This Batch into the catalog

We first try 2000 records and begin the import into the catalog at 10:11am. This took 40 minutes! Obviously we are not running a fast server but a low-end laptop (2ghz duo core, 3 gig ram).


Tuesday, October 18, 2011

New Koha Laptop

We had been using Mizstik's Koha Live CD to install Koha to USB sticks. This worked fine for the 32bit version and on my old Eurocom labtop but the new release 8 is 64 bit and that poses a problem.  It is harder to create a USB stick in newer versions of Ubuntu as it is now a install with manual partitioning of the USB 'hard disk'. The old version had an install to USB option that was automatic. The other problem is that students may have 32bit systems at home so their USB stick may not work. Finally the Eurocom had a 32bit cpu and only 1 gig or ram so time to upgrade.

The 'new' Koha laptop is a compaq 8510p with 4 gig. I tried installing a mini-pci wireless card but the machine uses a proprietary connector but the wireless USB stick that came with my DVD worked fine. It ran the 64bit liveCD no problem and installed perfectly to the hard drive. This version is 3.2.5,  has all the language packs, Zebra support and is a Z39.50 server. There is a Google discussion group at http://groups.google.com/group/kohalivecd

Next we set up Koha:

  1. run firefox and go to http://localhost/kohaadmin
  2. the username is kohaadmin and the password is kohalivecd
  3. we select en as the language
  4. the mysql database is koha running on port 3306 under user kohaadmin
The mysql root password is kohasqlpwd, we will install a mySQL client for database admin, although you can also use the web-based phpMyAdmin (http://localhost/phpmyadmin).

The public Z39.50 server uses:

  • port 9998 for bibliographic records with a database name of biblios
  • port 9999 for authorities with a database name of authorities

No username or password is required to search the Z39.50 databases.

Once the tables are populated it's time to set the configuration for Koha We select the MARC21 format for our records (see: http://www.loc.gov/marc/bibliographic/)
We select the following options:

  • Matching Rules for bibliographic records
  • Fast Add minimal record format (for ILL)
  • Simple MARC format (for multimedia)
  • Default values for departments, status etc
  • Coded Values
  • Z39.50 servers list
  • Sample patron types and categories
  • Sample Label and Patron Card data
  • Item Types
  • Sample Libraries
  • Sample News
  • Default Messages
  • Message Transports
  • Sample patrons
  • Sample Holidays and all the rest
The import process starts at 3:02 and finishes in under a minute. The next question is the indexer/search engine. Koha can use Zebra but it is a manual process to configure and to update. Since it is only required if you go over about 10,000 records and for doing demos on a laptop we don't need that many records we decided to skip Zebra for now.

Once installed we decide to test it out. Running a terminal and typing ifconfig procides us with the IP address of the koha laptop. First we test out the admin login by goint to http://192.168.1.114:8080/ and the staff client page is displayed.


Next we test out the OPAC by going to http://192.168.1.114/opac (which is running on port 8081) and the OPAC screen is displayed.


If you just go to the default port for the web server you get a message that:

This is the default web page for this server.
The web server software is running but no content has been added, yet.

This means you can create a library portal that incorporates a number of services or apps along with the library catalog in Koha. I've always wanted to show students how to install a CMS and then to create a portal that is linked to Koha.

To test out the Z39.50 we run Greenstone 2.84  and click the Download tab and fill in the z39.50 settings


Only problem is the Greenstone Z39.50 client seems broken again. It was working before as we had downloaded batches of 500 records from the Library of Congress LCDB database server (lx2.loca.gov:210).  A search for SQL in the book title would be @attr 1=4 "SQL", a search for books on php and mysql would be @attr 1= 21 @and mysql php and an author search for JK Rowling would be @attr 1 = 1003 Rowling,J.K. I'll have to try this in the lab where i think it was working correctly last term. See: Library Of Congress Z39.50

We decide to look for a standalone client and end up at http://www.biblio-tech.com/html/z39_50_clients.html which lists 5 clients and http://www.loc.gov/z3950/agency/resources/software.html which has a lot more information. We hit on the
Mercury Z39.50 freeware client which we download from http://www.basedowinfosys.com/projects/mzc in ZIP file format. Once installed we click search, database and it has goodly list of servers from Acadia to York. The Add button allows you to add a server. But there is no place to put the 9998 port number. There is a list of port numbers used but no 9998 and no way is indicated of adding a number although we suspect you could edit \Mercury Z39.50 Client\databases\ztargets.xml. We try anyway and as expected:

192.168.1.114
Result Count: 0
Records Returned: 0
Error Message: Connect failed (10000) 192.168.1.114

Then we try adding the port number to the address and we get:

192.168.1.114:9998
Result Count: 0
Records Returned: 0
Error Message: Database unavailable (109) Default

Which seems to indicate the connection was successful. We test against LC and it works and we export the results as a MARC file and view the .mrc file in MARCedit and it looks ok:

=LDR  00775nam  22002295a 4500
=001  13962025
=005  20050511163127.0
=008  050511s2006\\\\inu\\\\\\\\\\\000\0\eng\\
=906  \\$a0$bibc$corignew$d2$eepcn$f20$gy-gencatlg
=925  0\$aacquire$b2 shelf copies$xpolicy default
=955  \\$apc03 2005-05-11
=010  \\$a  2005927399
=020  \\$a0672328429 (pbk.)
=040  \\$aDLC$cDLC
=042  \\$apcc
=100  1\$aFells, David.
=245  10$aAdvanced MYSQl database programming /$cDavid Fells; [edited by] Shelley Johnston.
=250  \\$a1st ed.
=260  \\$aIndianapolis, IN :$bSams Pub.,$c2006.
=263  \\$a0602
=300  \\$ap. cm.
=963  \\$aVanessa Evans; phone: (317) 428.3211; fax: (317) 428.3310; email: vanessa.evans@pearsoned.com; bc: vanessa.evans@pearsoned.com

ToDo:
The thing to do now is to load up Koha with some records which means i'll have to refresh myself on how Koha works. I bought the packt "Koha 3 Library Management" book so will give it a read tonight.

Friday, September 23, 2011

Bootable USB Stick and Ubuntu 11


It's taken awhile but i've gotten to like 11.04 but there is one function from 9.04 that i truly miss. In the older version you could easily create a bootable usb stick by selecting System, Administration, USB Startup Disk Creator which automated the process.

That is now gone and the Startup Disk Creator just installs a bootable 'LiveCd' on your USB stick which is not the same thing. A google search reveals lots about installing Ubuntu from a USB but nothing much on installing a real system to a USB. Eventually i figured it out and the process is logical as it is the same as any manual install, but it takes more work than the old USB startup disk creator functionality.

In case someone has to do this here is how i did it. This process used an 8 gig usb stick and the 32bit desktop LiveCD for widest compatibility, a larger stick is better. I decided to create 4 partitions and to use all the space on the stick.

Boot a computer with the LiveCD. This requires your boot priority to have the optical disc 1st. If the Live CD does not boot check your BIOS boot settings (press DEL or F1 or F2 or F10 at startup to enter the BIOS)

When Ubuntu has started insert your USB stick and double-click the Install Ubuntu 11.04 icon

Tick the Install 3rd Party Software checkbox and click FORWARD

At the Allocated Drive Space dialog select the Something Else radio button and click FORWARD

This displays the drive partitioning tool which is used to manually set up Ubuntu. A single existing hard drive in the computer is listed as /dev/sda  formatted as NTFS. Your USB stick is listed as /dev/sdb1 with a FAT32 partition and a size of 8018mb


Select /dev/sdb from the Device for boot loader installation pull-down menu and then select your USB stick (/dev/sdb1) and click NEW PARTITIONTABLE to wipe out any existing data

You need to create the following drive partitions:

/boot which is the boot partition. This is where programs critical for booting the system reside
/ which is the root directory. Programs used for running the OS are installed here
swap which is reserved disk space for use as virtual memory
/home which is your home directory for storing files

Select Free Space under /dev/sdb and click ADD to display the Edit Partition dialog. Type 128 in the New Partition Size text box, select /boot from the Mount Point pull-down menu and click OK

Select Free Space under /dev/sdb and click ADD to display the Edit Partition dialog. Type 2000 in the New Partition Size text box, select swap area from the Use As pull-down menu and click OK

Select Free Space under /dev/sdb and click ADD to display the Edit Partition dialog. Type 3000 in the New Partition Size text box, select / from the Mount Point pull-down menu and click OK

Select Free Space under /dev/sdb and click ADD to display the Edit Partition dialog. Type 2891 (or whatever is the remaining space) in the New Partition Size text box, select /home from the Use As pull-down menu and click OK


Click INSTALL NOW to being the Ubuntu installation process

When the Who Are You? Dialog is displayed type in your full name and choose a name for your computer like gnickers, enter a username and a password and select the Log in Automatically radio button
Click FORWARD and Ubuntu is installed to your USB stick (this takes awhile....)
When complete Remove the LiveCD and press ENTER to restart the computer to the USB stick


Saturday, July 2, 2011

Music Center Project


This has been kicking around in my head since i found three discarded Profusion/X music center devices. They ran a customized version of Red Hat and connected to a licensed music server to stream audio to stores in a mall. Gave one away but kept two to play with.


Obviously, the license had expired but the audio form factor of the case intrigued me and upon opening it up i found a Via mini-ITX board with a C3 533mhz processor, 128 mb of DDR ram and a 40 mb hard drive. May not seem promising but that board packs a lot of tech into a small space, there are 2 DDR ram slots, two USB 2.0 ports, 10/100 ethernet, onboard vga video, PS/2 for keyboard and mouse and 3 pci slots plus a front panel DVD drive. Not too shabby.


After rummaging around in the parts cabinet i came up with two 512mb DDR 400 sticks, a 200 gig IDE hard drive, a pci angle bracket and a ATI rage pro pci video card and a Packard Bell Fast Media remote plus the Cambridge Audio 2.1 speaker set. Unfortunately the pci angle card was not quite the right form factor but i was able to find one on eBay for $5. So for now we upgraded the ram and the hard drive and replaced the stock optical with a combo drive. Not that we will be burning cd's on this unit but it helps to be flexible. When the angle card arrives we can upgrade from the onboard video.

The system booted fine and we went to the BIOS to change the settings. First we assign 64mb to the onboard video, optimize the BIOS and do an 8X overclock of the C3 cpu resulting in a whopping 1Ghz of speed (while you can go above 8x the board locked up at boot). The board's BIOS is a wonder of flexibility with lots of settings. So now we have a 1gig pc with P3 performance - what to install?

We used to run XBMC on a revo so it was a first choice. Unfortunately the live CD does not run on such old hardware, in fact all the media distros we tried failed to initialize the x-windows GUI or failed to boot. Many are optimized for i686 and won't run on an i386 clone cpu. So we tried Microsoft Windows XP pro which did install but failed to install drivers for the network (which is realtek chip), the audio etc. It ran but slowly and hunting down XP drivers on the internet is always a frustrating experience. What about an older version of Ubuntu? So we haul out the 9.04 desktop 32 bit cd and it boots and installs perfectly. Video is not bad, internet works and so does the audio and USB. We remove some of the uneeded services and apps and get a reasonable performance, hey to even runs the GIMP and OO at 2002 speed. You could even use this as a desktop in a pinch, except no flash in the web browser.

The only problem here is that just about any media software won't run on the C3 cpu. The included movie player and the included rhythmbox audio player works but xbmc and vlc won't install. However, we set rhythmbox to run automatically at boot and have in inhale 3 gig of FLAC audio files from the network.

Next we attach the speakers and put it in shuffle mode. How does it sound? - Excellent as a near-field sound system in a small room. Quite pleasurable while working. It's like listening to 70's FM radio. In fact I am using this with singles from 70's/80's and who knew Alice Cooper, ELO, Deep Purple, et al could sound good? I should hook up the Roland monitors to test and then the Spherex 5.1 system to compare.

The suprising thing about audio is that you never know what might sound good for certain applications. I recently hooked up a pair on 1969 Dynaco A-25 speakers to a 20 watt amplifier and fed it from a original Sony walkman cassette. This is certainly not an 'audiophile grade' system but it sounded quite good. In fact i ended up listening to it all week, trying out different kinds of music and inputs. The conclusion was this system sounded best when fed early 80's and 90's funk from analog sources (not CD's!). Gap Band, Dee-Lite, Morris Day, etc all sounded very good in a small room at middle field distance.

Time for some lunch...

Upgrades:

  • better video using a fast pci video card
  • customize LIRC to use the packard bell remote
  • replace default unbuntu window manager with a lighter one
  • wireless
  • replace current board with a modern mini-ITX or mini-ATX board?

Tuesday, May 17, 2011

Calibre Content Server


The Calibre content server is working fine on the home network. It is currently running on the macbook/win7 laptop. When a device with an OPDS-capable ereader software like Stanza is running the Get Books icon displays the calibre content server library and it is easy to download books to the device such as an iPad, iTouch or Android tablet. Once the course is over i may install a permanent content server using an old G4 macbook.

The problem is the work network. Devices cannot detect the content server when the laptop is running on the UWO wireless network. Devices just display 'Searching....'. This is a problem - you can't demonstrate how it will all work.


The hack i am testing now is to run a rogue wireless access point that is not connected to the internet. A standard linksys wireless router should enable the macbook to get an IP address from the linksys DHCP server and then running calibre should make it available on this wireless network which a device then connects to. Once on that wireless network the content server should be found.

Step 1 - configure the wireless Router

Had to run Fing (look@lan replacement) as the new firmware for the router doesn't display a very good dhcp clients table. Armed with the IP address i set up the linksys to be a dhcp server with an ip range of 192.168.1.20 to 192.168.1.30. We then unplug the cat 5 cable from the linksys to the network router so that it only serves ad hoc connections.

Step 2 - connect laptop to the wireless router

We set the macbook to connect to the LIAM network and lo it picks up the dhcp server and gets issued the IP address of 192.168.1.20 which is as it should be.

Step 3 - run the calibre content server

Done!

Step 4 - connect ipad to content server

Odd, iPad says unable to join LIAM network. It can see the network but refuses to connect. Ok , next we fire up the iTouch and change it's network to LIAM. It connects. We run Stanza and click Get Books. The calibre content server on macbook is listed and there are all the books! We select one and it downloads ok. I wonder if the iPad mac address is not in the allowed table, yes it was not so we add it. We run Stanza, click Get Books, Shared and success. We can now read the Saskatoon Star Phoenix articles we downloaded from the RSS feed in class today.

So the solution to uwo network problem is to bring in our own wireless device and run an ad hoc wireless network. We will test this tomorrow for saturday's THATcamp session.

Tuesday, April 5, 2011

Ebay Frustration

Ebay drives me crazy! A good principle for a merchant is 'don't get in the way of the customer'. I go to ebay to buy things. A simple idea - but here's where it gets frustrating.

I don't like auctions and rarely ever participate.

The reason is i got ripped off a couple of times when ebay started and it quickly was obvious that you have no recourse but to leave negative feedback on the seller who immediately puts negative feedback on you. Ebay is no help in resolving mis-representation, faulty merchandise or other problems on auctions from private sellers. The auction model is outdated as a the primary driver of ebay's business.

So 99% of the time i use the buy it now option from ebay stores.

I like stores because they are a business and if they wish to stay in business they have an incentive to keep the customer happy. As one Scot noted a long time ago:

"It is not from the benevolence of the butcher, the brewer, or the baker, that we expect our dinner, but from their regard to their own self-interest." Adam Smith
I don't mind paying a bit more for the service. If things go wrong, i have found an ebay store is likely to work with you to fix the problem. For example, i purchased a Dell Precison 470 recently from Electronics Cafe on e-bay but it arrived with a dead motherboard. They cheerfully paid for the cost of a replacement system board.

Anyway, the problem is keeping track of stores. Ebay does a horrible job of it. Sure you can save sellers into a list but finding a particular store is a pain and trying to build up a list of favorite suppliers seems rather difficult.

I also like local suppliers

The shipping is less and why not support people in your area if the prices are competitive? So why can't i find all the local ebay stores that deal in computers or electronics?

Ebay works ok when you are looking for a particular item but as all grocery stores, bookstores and malls know - the longer your keep the customer in the store the more likely they are to buy something. If ebay made it easier for me to browse local suppliers who sell the kinds of stuff i like to buy then i would buy more. Maybe their tag line should be 'Ebay - Saving You Money'...

Friday, March 11, 2011

iPad, ePad and more


With the $100 price drop on old iPads we ordered the 16gig model from the Apple store for $369 and it arrived this week. The first step was to hool it up to the macbook and download all the useful free apps from the apple store. Our interest is in looking at the device as a publishing model so we downloaded all the ebook reader software such as Stanza, apple ebook reader, kobo, kindle etc. as well as newspaper and magazine apps like The Economist, The Wall Street Journal, and the National Post as well as Wikipedia and some comic book readers. We also grabbed the Dropbox app for our online files and the Google app so we can access our Google docs files and our iGoogle desktop and Teamviewer, an excellent VNC type app that runs on all our machines.

The Teamviewer free app allows you to control your laptop or desktop from the iPad not not the reverse. Will have to investigate if the paid version allows the pc/laptop to control the iPad. It would have to translate mouse clicks on the computer to touches on the iPad so this may not be possible. I looked at the vga cable but it is expensive ($35!) and external video is an app function, not a function of the OS.

Update: Saurik has released a VNC deamon for iphone and others have also gotten VNC to work so you can view ipone/ipad from another computer. Only problem is that it requires jailbreaking your device. I did this on the iphone but may or may not with the ipad. Just installed iOs 4.3 anyway...

We browsed the apple store for free books and downloaded a few classics but most of the books we want are sitting on our server in PDF and CHM and epub and djvu formats.

We read some epubs using the apple ebook reader and they were fine. But how to get our pdf's over? We though of using moving them to dropbox and trying the app but then remembered the Calibre to Stanza method we had used to get books into a first gen iTouch.

Running Calibe on the macbook and pointing it to the ebook network share allowed us to choose PDF books individually to import (and convert to epub) or to batch the process. We grabbed a few books and magazines to test out. Then we clicked the settings icon and choose Preferences, Sharing, Sharing over the net. This allows you to run a OPDS server catalog on localhost at port 8080. Once the server is started we goto the stanza client and click the Get Books icon dor Shared which displays a Book Sources dialog box. I typed in Calibre as the name with a URL of http://192.168.1.105:8080 (for the dhcp addr of the macbook) and it connects to display the books in calibre (on macbook).


You can browse by Newest, Title, Authors or Publishers. Clicking on the cover for a book displays a preview of the book and a Download button which transfer the epub to the Stanza library.

As test we bring in a .cbz comic book and some other types. And we convert the Kick-Ass DVD to an MP4 file to test out the video.

Update

Taking screenshots on the ipad is a breeze, press the home button and the power button together and the screen makes a camera clicking sound and then flashes white. The photos in .png are saved and can be viewed with the Photos app. To transfer them to your computer just plug in the iPad and iPhoto runs automatically and retrieves the photos. Select the ones you want and click Import Selected. You can then drag them out of iPhoto. Sweet. While i have not been a fan of iTunes in the past, it is now the cornerstone of the Apple digital world strategy and the integration of apps is impressive compared with the Windows world.

Tomorrow:

Compare originals on the mac with the epub converted copies on the ipad.

Monday, March 7, 2011

Stop Motion Movies with iLife


Liam wanted to make a stop-motion animation film. He usually just records on the flip cam and uploads direct to youtube. So we built 4 sets out of lego. If i had been smart i would have build the walls in the shape of a + and put it on a lazy susan so that 4 sets could be easily available.

Anyway, I put the camera on the gorilla pod and he shot a series of scenes for his first TV show called Droid Hospital. I fired up iPhoto and hooked up the camera to import the pictures and then launched iMovie to bring them in. It took a bit of fiddling to get the photos i wanted, the quick and and easy solution was to FLAG the photos and then to set IMovie to look for flagged pictures. I also added two google image shots of a real hospital.

It was no problem putting the images on the timeline. But then we got sidetracked as the director decided he didn't want to do the dialog but to have text bubbles with the comments, like an animate comic book. Well, imovie and iPhoto lack the ability to edit photos that way so we fired up Comic Life which is designed to make comic books or comic book movies.

There was no problem importing the photos from iPhoto and adding the comments in text bubbles but getting the pictures out seemed impossible. The Export function exports a whole page not just the image. I could use grab to capture the picture with text but that seemed a lot of effort. The other option was to bring the photos into iWork and add create a blank presentation slide for each picture. Add the text and the export the slides as a series of images. This works in keynote (and powerpoint too). It's a quick way of churning out a web site banner. In fact, in keynote you can add a transparent gif image to your banner as a logo and it will export out a nice png or jpg banner in any shape with gradients and the transparent logo. (powerpoint does not support transparent images but otherwise works the same). Again, this seemed a lot of work.

We decided to go back to imovie and to add the dialog to the scenes. This is fairly easy to do, you select a clip, click the mic icon, select the clip and it countdowns 3,2,1 and record. You do have to time the dialog so that it lasts only for that scene (each pic is a scene). A couple of takes for some and it was done. Then we added sound effects from the limited iLife sound effects library. It would be nice it there were low cost libraries to add sounds like Garageband jam packs.

Anyway, once the sounds and incidental music was added the movie was rendered down and uploaded to liam's account on youtube.

ToDo:

- Find some soap opera sound effects...cheezy organ riffs etc
- Find soap opera-ish theme music for the opening (The Days of The Week?)
- Get some HALO sounds/music samples for the Covenant set and maybe some Star Wars

I have all these so i could extract them myself but if someone has already done it...

Wednesday, February 23, 2011

Windows - still stupid after all these years

Now that i am using Windows 7 a lot more for work i am so upset in how useless it is for common tasks. We all knew that file operations were pretty much broken in previous versions, it took forever to do any meaningful stuff with lots of file and it tied up your machine, sort of like working on a beige mac running system 7.

So today i finally got around to do some file maintenance. I attached a 1 terabyte LaCie Quadro external hard disk to the macbook pro using firewire 800 and proceeded to copy about 25 gig of files from the mac to the windows partition. Most of the time was spend figuring out which files to move, the actual 1-5 gig copy operations were complete before i could decide on the next group.

Now i boot the macbook into Windows 7 (boot camp). The external fw800 windows partition shows up. It is a simple task to copy the 25 gig worth of files from the external drive to another external drive hooked up (also a LaCie but firewire 400 formatted for windows). How long do you think this operation would take? I think i spend about 30 minutes last time i did it on Linux (in fairness the linux box has an e-sata connection).

Well, it's been 10 minutes and Windows is still thinking about the copy operation, it actually hasn't even started yet! And the copy dialog box estimates 16 hours! It says 'discovered' 5,764 items and then sits and sits and sits.

In fairness the previous osx copy was between laptop hard drive and external hard disk and this is from external hard disk to external hard disk but 16 hours?

When i do similar file operations on the windows 7 desktop it is slow and ties up the machine. How can that be on a dual 3.2 ghz xeon box with 4 cores? Obviously it is not hyperthreaded - why?

Update

It's 10:15 am the next day and 1,700 files still to be copied, says 9 hours to go! It finally completed this afternoon. I am now moving some files around on the external drive connected to the win 7 pc and every so often it has to re-read the directory from the drive. There is a green progress bar across the top of the file manager and it takes a couple of minutes to read the directory of the 1tb external. No wonder file operations take so long.

Monday, February 21, 2011

The Android Reading Device

UPDATE: Installing Apps

Took a while to figure out how to do this without using the Android market. Since the wireless is still having problems (although i connected ok at work - must be my 3 WAP's confusing it), i wanted to download and install apps directly.

These are known as non-market apps and all you have to do is:

- Click settings, application, unknown sources to allow install of non-market apps
- Click settings, application, development and turn on USB debugging (i don't think this is needed to install apk files that you copy to the card, but is needed to run an installer application on the desktop that will install apk files to the device, if this is what you want)
- download the .apk files and copy them to the internal SD card or the external SD card
- after copying unplug the USB cable
- run APKinstaller app and it displays all the apps in the downloads directory (if the usb cable is plugged it find no files!)

An cheapo Android tablet came my way so the idea is to see how effective it is as a reading device. I had tried the iPod touch but the screen is a bit small.

This is a 7" 800x480 screen with a ARM 700mhz cpu running Android 2.1 (similar to many models available under names like epad, apad, irobot etc). Nothing fancy but it has a 1.3 mp camera, 2 usb ports, cell, wireless b/g, speaker, earphone and a micro SD slot (32gig max). Only problem is the wireless if flaky, it finds my WAP's but fails to hold a connection.

Anyway we are not interested in this for the internet but as a reader. The idea is to find a device that will allow us to test out various ebook apps and ebook formats. The device came with an ebook app called Shelves that did a decent job with .epub files but failed to open others and not so good at PDF's.

Following apps were downloaded and copied to the SD card:

  • Aldiko_Book_Reader_1.2.6
  • Droid Comic Viewer
  • FBReaderJ-0.7.17
  • kindle
  • kobo
  • Laputa Book Reader
  • Wattpad_1.9.4
  • zthMoonReader
  • PDF_Viewer_0.2.8
  • Adobe_Reader_9.0.2
  • beamreader-v120

The .apk files were transferred via USB cable to the SD card on the device along with a smattering of ebooks in epub, mobi, pdf, cbr and other formats. On the tablet APKinstaller was used to install the apps.

Our test document is 20,000 Leagues under the Sea in cbr, fb2,lrf,mobi,pdf,pdb, djvu and rtf formats. So here is a quick first impressions tour:

Adobe Reader

It displays all the PDF files in a nice list but when you click on one it returns the error message 'invalid path' . Not obvious how to change directories to the other card. Not so good.

Beamreader

Loads and allows us to browse for folders and a nice list of all the PDF files. It crashed on 20000 Leagues Under the Sea but opened the other books ok.

PDF Viewer

Runs and allows you to browse for files. No icon but nice large font. Crashes on 20000 Leagues under the Sea. Open other files ok. A bit slow on the pages and refreshes.

Aldiko

Nice display of book covers on a bookshelf. Good navigation control, finger swipes load the next page but not with a turn, it just slides in smoothly from the side. Lots of settings. Neat dictionary function.

Update: you can copy epub files to the eBooks/import folder on the SD card and then in Aldiko press settings, import and it imports the books to the library and displays them on the shelf.


Kindle

Needs the cell or wifi connection to login to your Amazon account. So no further until we solve the wireless problem. Would be useful to be able to read offline.

FBreader

Brings up an explanation screen of how it works. We have to press the Settings button to get the options menu. The library icon goes to the sd\Books folder we had created. We load the 20000 Leagues under the Sea and it works. The navigation is clunky we have to keep going to the setting button. For example the screen does not rotate automatically you have to do it manually and navigation is non-intuitive.

Kobo

Like Amazon you can't get anywhere without an internet connection. Not a fan of this type of design.

Laputa

Cute entry screen with tips. There are nags for the paid version. The bookshelf is empty save for the Bible. Clicking brings up a list of ebook sites like Manybooks, Gutenberg and Feedbooks. The main way to get books into a collection is to download, to get books on your card you have to click the Home icon to get to the top level and then click the settings button. This displays an Import icon that when clicked allows you to browse the internal card, not the micro SD card. I made a Books folder there but with only 2gig of storage this is not a viable option. We loaded in an Agatha Cristie to add to our library and then loaded the book to read. Next is a configuration screen for fonts, flip mode and sizes. One thing odd about Android is the scroll bars work the opposite of what you would think and they are very thin. With the bar at the top you scroll down but nothing happens, you have to scroll up. This seems non-intuitive. Nice quick page flips. Quite readable font. This program is an option especially if you download books.


Moon + Reader

Displays a list of all the files along with the file extensions, i like that! The icons are not good, each book gets a ? icon except the epub book. I think this means it cannot read the others (so why list them, bad design). Ah, if you click on an file format it does not understand, it actually loads it! So a .cbr file display the binary codes, sort of like loading a word .doc file in notepad! Ever worse, if you kill the app and then reload it remember the file you had open and re-opens it. Arrgh. Have to figure out how to close a file.


Wattpad

Requires you to connect to the internet before you can do anything. But if you click OK and then the settings button you get the menu. But there seems no way to import any books into your library. Also, when you click the back button it should return to the previous state, if i had the settings menu open and drill down to a setting and then go back, the menu should be there, not a blank screen forcing me to press the settings button again.

ThinkFree Office

Although not an ebook reader it is important to be able to take along reports and such. I was excited to see if give an icon to the djvu files but it could not open them. We open the .rtf version of 20,000 leagues under the sea. It runs for a while opening the file. Loading, loading, loading. We kill the operation. Interesting, when we go to load the .pdf version of @0,00 Leagues that crashed the other apps, it notes the 'page catalog is invalid' and ends the operation gracefully. Other pdf's load ok. It also does auto orientation and swipes. While a large app it does a credible job on pdf's. Will have to try it on some office files.

Droid Comic (ACV)

Awesome, the cbr files look fantastic. You do have to push the settings button to rotate and zoom but this may make a decent comic book reader.

Summary

Some apps good, others not so good. Android 2.1 suffers from some usability issues on a tablet probably due to it being a phone OS. It says things like 'Shut down your phone?". The finger controls are a bit rough, in particular scrolling is very error prone, swiping a finger to scroll the screen up and down loads an app by mistake most of the time. Larger scroll bars would help, i ended up using my iTouch stylus a lot. Will have to try Liam's extra Nintendo stylii. As to the LCD screen, fairly bright for apps and games but a bit annoying to read text for a long time. Does a cheap Android tablet replace a good ebook reader like the color Nook. No - it was 1/3 the price and it allows you to read your own books without being tethered to Amazon or Chapters. The problem with this device is the settings and exit buttons are the same, press on the left to access the settings in an app but press towards the right and the app exits. Since the button is incredibly small it is very easy to exit. Then again this is not an iPad!

Friday, February 18, 2011

Koha LiveCD 10

The new Koha liveCD based on ubuntu 10.10 is out so we decide to give it a try. Our first boot on a dell gx280 failed and then we realized this livecd is a 64 bit version and the dell's bios does not support 64 os. We then live booted on our trusty dell precision 470, a dual xeon pc.

The new version has icons on the desktop for the koha opac and for the admin page. Our first goal is to install this on a bootable USB stick.

First we plug in the stick and it is mounted. This is a 4 gig stick running the older version of koha we installed using the liveCD created by Professor Prasad. Next we double-click the install koha live icon and choose english as the language.

The install requirements are 3.6 gig free drive space, internet connection and power.

ODD - when we click the release notes hyperlink it goes to http://www.geekconnection.org and displays the remastersys backup utility page1

The next dialog box offers a chance to download update while installing and a forward button. The problem is that the installer does not seem to offer a choosable location, it detects your hard drive and offers to unmount it. Will it later allow you to choose a location? For safety we decide to shut down, unplug the hard drive and try again.

The liveCD boots and we plug in the usb stick.

Option - start the installer instead of booting the live system. It notes that dev/sda is mounted and offers to unmount it. We choose YES to unmount.

The next dialog box called install offers to erase and use the entire disk or to manually set up the partition map. We go with the entire disk so our maxell 4 gig flash drive will be used.

We click INSTALL NOW and say we are in Toronto with a US keyboard and setup a username of seyler with a password of seyler and log in automatically setting. This is the standard ubuntu install routine.

Now we wait while it copies files and when it finished we click restart and remove the cd. It reboots to the USB stick.

We now double-click the Koha Admin desktop icon which presents a login page prefilled with the default username of kohaadmin and password of kohalivecd. We click LOGIN and the web installer page is displayed.

Koha Setup

First is to choose a language, we choose en for english, assuming that later it can be changed to German. The default mysql database settings are displayed:

database: koha
host: localhost
port: 3306
user: kohaadmin

At the web installer step 3 we select MARC 21 as our 'flavor' with the following options:

- select matching rules for bibliographic records including ISBN and ISSN
- fast add for ILL or on the fly cataloging
- simple for common types like cd's, dvds, cassettes, kits etc

Under Optional we select

- basic default values for dept, item lost status etc
- coded valies for holdings statements
- a sampling of z39.50 servers for copy cataloging
- sample patron types and categories
- sample label and patron card data
- sample holidays
- default item types (material types and collection codes)
= sample libraries and categories, new items and default messages
- sample patrons and default message transports for sending overdues, notices etc by email

Then we click IMPORT button at the bottom of this very long page. We note a couple of errors:

- table 'systempreferences' is full
- table 'marc_subfield_structure' is full

Indexing Engine

We choose the nozebra option as this will be a small library and click CHOOSE and FINISH and are redirected to the staff login page.

We click LOGIN This returns an error message, 'the format your asked for is unrecognized'. We click the back button and choose springfield library this time. same error.

We try http://localhost/opac and the library catalog page is displayed. We try http://localhost/koaadmin to display the admin page. The login notes that our session has timed out. We try logging in to my library but the same error message. I think we will re-do the koha setup and leave out the other libraries optional data.

First we have to delete all the tables from the mysql koha database. We goto http://localhost/phpmydmin and login as user root with password mqr but that does not work. And firefox has crashed so we kill it. The release notes seem wrong. We could start all the way over. So we restart.

Ok. Ready to go again. The problem could be the usb stick only has 28 mb free after install. We decide to limit the optional data installs.

we leave out
- code value for holdings statements
- sample label and patron data
- sample holidays
- sample libraries and library categories
- sample news items
- defined message transports
- sample patrons

and we click IMPORT. If this doesn't work will we use the hard disk portable usb. Only one error this time - 'table marc_subfield_structure' is full.

We try the admin page and the staff client page is displayed successfully. So the problem sees to be space related. Although the staff page doesn't look quite right. So will have to use the portable.

tomorrow


Friday, February 11, 2011

Media Center IV


Now that the media center is working perfectly we can't resist fiddling about. A new barebones SFF (small form factor) dell gx 280 came our way from Vfxweb, (where i've happily shopped for many years). Socket 775, DDR2, pci-e, sata, pci and lots of USB ports in mint condition for about $30. From the parts box we pull out a P4 2.80 ghz, a 40 gig sata drive, and 1.2 gig of ram and a Nvidia quadro 290 video card which gets converted to a low-profile bracket. We try a 3.4 Ghz P4 but the fans immediately go into full speed mode - need to get a new tube of thermal paste . Boot up with XBMC live cd via an external USB optical drive and it runs perfectly.

I set up some of the shared libraries from Windows 7, no need to set it against the media server yet. The quality of the picture is excellent.

If i run ethernet to the front living room the ancient Zenith 29" professional TV (with VGA input!) could make itself useful when analog broadcast television finally dies. Or i could put in a wireless card, but the problem there is making sure it works with Linux, wireless chip vendors are very bad when it comes to linux support. I am also not so sure about overloading the 3 wireless routers with video traffic. Best to stick to wired, that location used to have cat 5 wire a dozen years ago when DVD players cost $1000 and a giant tower PC with a DVD-ROM and IR keyboard/mouse fed video to the new Zenith 29" TV.

The attraction of putting a media center client there is the display is perfectly orientated to the couch, and high usability of the HCI (human couch interface) is our design goal. A horizontal position is considered preferable to a vertical one in HCI circles.

However, the windows remote did not get detected when i plugged it in. I know it was setup ok when i last used it with the acer revo so will have to look up my notes how i configured the item. When i press the remote the IR lights up and it works fine plugged into a windows 7 box so it is a driver issue - maybe i need to have it plugged in when the system boots.

The only problem is that the install option from the live CD seems to fail with the video display not working. Since this disk is from 2010's project i should download a more recent copy.

I'll do it tomorrow...

Thursday, February 3, 2011

Mac Emulation on Windows 7


Not feeling up to working so what's a guy to do? Obviously since i got rid of the last G4 OS9 machine 2 weeks ago it's time for a CIV II fix. This means emulating a classic mac on some OS. Since the work desktop is now Windows 7 we decide to try that out. We used to run Basilisk on windows xp many years ago so we decide to go that route as the minimum requirements for Civilization II are an 040 mac and a few megabytes of ram.

First is to download and install the GTK runtime environment for Windows that enables us to run software written for the X windows environment. GTK (otherwise known as the GIMP toolkit) provides widgets (on screen controls) and tools to build graphical windowed applications. We go to install verion 2.10.13

The install finds that C:\Windows\system32\iconv.dll may conflict with programs that rely on GTK+ 2. To prevent such conflicts, it can automatically rename the file. If you choose to rename these files, their extension will be changed to .dll.off.

We decide to mess with the windows system files, recognizing the problems inherent in window's reliance on DLL's but no liking having to modify the system. Ok, installed so next we download BasiliskII and extract to a folder. We search the old mac backups and find a quadra 650 rom file and extract it and place it in the Basilisk II folder. We also get a system 7 book disk and put it in the Basilisk II folder and then download the system 7.5.3 files from apple's ftp site. Next we copy the file cdenably.sys from the Basilisk II cd-rom drivers folder to c:\windows\system32\drivers. This driver allows your windows optical disc to read mac disc, pretty well essential for installing software.

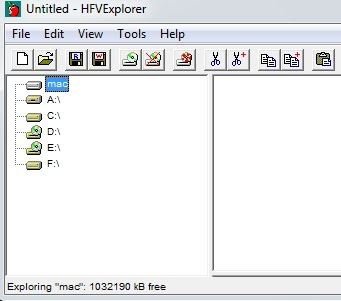
Next is to create a fake blank hard drive (which is really a file that looks like a drive). The included HSF Explorer windows utility is used to create a mac formatted 'hard drive'. We select File, Format New Volume and we give it a name of mac with a whopping 1gig of space and select the Basilisk II folder as the location of the 'hard disk' file. Click OK and it is created.
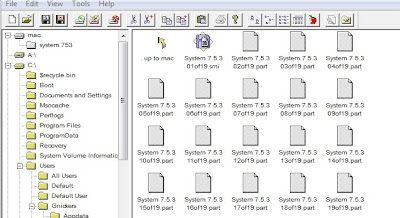
Now that we have a 'hard disk' we copy the system 7.5.3 files to the blank disk image. We go to drag the system 753 folder but it is not in downloads. Where is it. We actually go back to apple's web site! and right click as firefox will remember where the files were saved to. We find the folder and go to drag it to downloads but windows makes a shortcut - we don't want a frickin' shortcut we want to move the files you stupid OS. So we delete the shortcut and now the folder has disappeared! Searching the local hard disk finds nothing. We actually have to restore the shortcut to examine it's properties to find out the folder is actually located at "F:\bin\Dell precision 470\docs\system 753". Arghh. We make sure to CUT and PASTE this time.

Ok back on track, we drag the system 753 folder to the mac 'drive' and it seems to work OK.


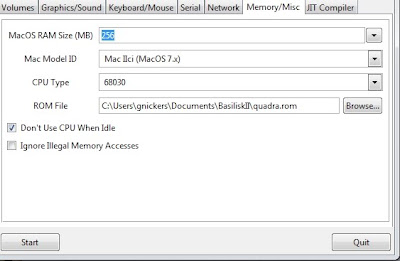
We can now exit the utility and run the Basilisk II GUI application which allows you to set the preferences. First our optical drive is D: and we also set the windows size to 1024 x 768 and the ram size to 256mb and the rom file to use our quadra650.rom file. We decide to leave off the network as it is not needed. In the Volumes tab we click ADD and select the system70 book.dsk image and the disk image file we created with the HFV utility. For now the model id is a IIC 030 but later we will change this to a 68040 with a quadra 900 model id.


We click the START button and get the black screen of death...run the windows task manager and kill the application. Must say the OSX way of killing apps is so much less work. It appears and older .exe file may solve the problem, we need the one in the 27-08-2008 build. Ok we do that. Now the older exe is in the Basilisk II folder. We re-run the GUI and click START.

Ah the mac 'boing' and a grey screen. Error message about no Appletalk connection (because we did not turn on networking) and a moment later the old system 7 desktop appears.


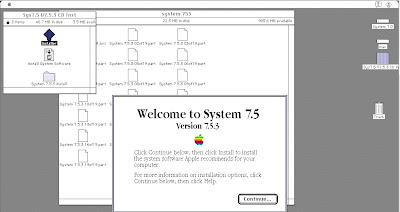
Now we click on the mac hard disk and open the system 753 folder we copied there earlier. Double-clicking the 01 of 19.smi icon extracts the files and builds a sys 7.53 cd isntaller icon on the desktop. Double- clicking that brings up a folder with the installer software icon. We click it to start the install.

First we choose a Custom Install and select under System, Universal System for any Mac. Then under Networking we choose Open Transport and Network Software Selector. This will allow our 'mac' to go online if we decide to let it. Hey we could run Netscape 2 for the mac...Finally we click Switch Disk and select the giant 1gig mac 'drive' as the target and click INSTALL.

Off it goes. When the install is finished we shut down the Basilisk mac (Special, Shutdown) and rerun the Basilisk GUI to set our final preferences.

First is remove the system 70 boot disk. We don't need it anymore. Next let' set the cpu and the id and turn on networking. We also decide to check the Enable my Computer box on the GUI which should allow us to drag files from windows to the mac without using the HFV uitility. So we could download mac files and copy over? Will have to test.

Ok we click START and it works but one problem, the CIV II original cd is a dual disc with an audio cd portion and a data cd part and only the audio cd gets mounted. I have a burned backup copy but cdrw's do not seem to get read and cause basilisk to crash with an exception. Ok so we will have to use the macbook to read the discs and then copy the files to the win7 machine and then drag them to the mac and install. I'll do it tomorrow....


ToDo list

1. install Stuffit Expander
2. upgrade to system 7.5.5 (last free one) - should have kept my retail 7.61 and 8.1 cds!
3. install CIV II

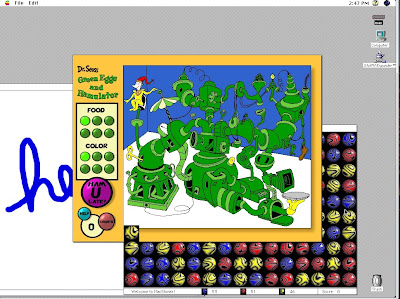
2 of out 3 done. I may create a larger 8 machine and see if i can get 8.6 running. Stability is a problem right now with exception crashes quite frequent. But here is what it looks like now.


Monday, January 24, 2011

Windows 7 and external Sata drives

So tonight i finished the install of essential apps on Windows 7 and disconnected the old xp machine. Since all the work files are on the external western digital 1 terabyte external i thought it would be simple to unplug from xp and plug into windows7. All the other computers (mac/linux) have external e-sata drives (so much faster than slow USB), so what could go wrong.

Fire up windows 7 and it doesn't mount the external drive. Go into Administrative Tools, Drive Management and it still can't even find the drive. Weird. After wasting a lot of time poking around windows and looking on the internet it looks like lots of people have similar problems. This boggles the mind. Just to make sure i haul out a second e-sata hard drive, a LaCie this time. Same problem - not mounted. I booted windows with both drives just to be sure.

I goto western digital's site and they have a firmware update and some wd drive management software. Yikes, if i install the firmware what if it bricks the drive? Especially since the backup drives got cleaned and moved to the living room to connect to the Oppo BDP-93 (which btw had no problem mounting the drive, Steve Ballmer). Best to back up the course files.

So i plug the drive into the USB port (all my externals are 4 interface drives, usb/e-sata/fw400/fw800) and windows recognizes it and starts seaching it for music and other files. I put a stop to that right away. Now we start up the copy operation and wait and wait and wait and wait and wait...i said USB was slow, right?

Might as well go and see if the HDCD burning problem with Brasero is fixed....i suspect optical drive has gone bad...i see i/o errors in the log...

To Be Continued

Ok firmware update worked ok but drive still not recognized when plugged into e-sata
Next we install the WD drive manager setup software - installs but no menu item??? and it is not a control panel...

We decide on a low tech solution, grab and old firewire pci card from the box 'o parts and put that it.....OK windows recognizes the card. Let's shut down the external and plug in into there..ok it immediately installs the 'device driver software' and the stupid auto search for content comes up. Gee, in the days of mega terabyte externals maybe the default should be NO auto....

And the drive is there. So let's see - a modern e-sata interface that should be plug and play does not work in Windows 7 but an ancient technology going back to early macs works automatically. Lesson - don't discard your old firewire stuff yet...

PS

Multi-tasking in windows still sucks badly. Doing any kind of large scale file operations ties up the computer completely until the task is done. I am so not used to this. Linux and OSX are so much better at multi-tasking. People focus on whether the OS is 'faster' and forget about all the time you spend waiting for windows. The more time i spend in Windows 7 the less i like it. Sure it is prettier than XP and is not as absolutely annoying as Vista but in reality it is no big improvement.

Thursday, January 20, 2011

Media Center IV


The quest for the perfect media center setup continues...

So far we have been fairly happy with the combination of TVersity media center server and Xbox client. The only problems have been the poor support of Windows for such essential codecs as flac and mkv among others. However it does work ok, playlists seem broken and tagging is a pain but livable.

Today we hooked up the Oppo BDP-93, a player with usb/e-sata, wired and wireless network and a built-in upnp media client. First we downloaded and updated the firmware, a very easy process using a USB stick.

Next we access the Home menu which displays all the options.

Note the built-in Netflix client which works and the Blockbuster client which is banned by the Canadian Gov't (courtesy of the CTRC apparatchiks). These are useful services that are a lot cheaper than Robber's Cable but since your internet comes from Robber's Cable (ya gotta love monopolies) you end up paying through the nose anyway.

With an attached hard drive (USB or eSata!) the movies and music functions read files directly from the drive. This could be handy but then i've have to copy files to that device. I'm more interested in playing streaming audio/video from a media server in the basement. The My Network option lists any media centers on the local network.

One neat thing about TVersity is that you can add YouTube channels and then stream those videos to your TV. We decide to play Dire Straights, "Money for Nothing" because it has also been banned by the Canadian Gov't because 1 person complained. This file is in flac format but it is listed as WAV by the media player.

The audio files work well and sound great. Really cant hear a difference between Oppo and Xbox, which is as it should as the source files are just strings of bits. I didn't try some of the more esoteric files such as DTS and BD (blue-ray rips) yet.

Where there was clearly a problem is in streaming video. Some quicktime (MOV) and MKV and MPEG4 files would not play. When the software has problems with a file it keeps on trying to play it, the streaming does not stop. With one file it even managed to lock up the player, forcing a hard reboot with the power button. In fairness to Oppo it notes this is an experimental feature, albeit one i was very interested in and which partly influenced my purchasing decision. On the plus side, since this is software, updates may come along to fix problems, add codecs and features. I'll have to test all the MKV video files as the Oppo FAQ on the wiki indicates it does support mkv.

Conclusion

A nice upgrade to the old Oppo 980HD (i had two, going to keep one) but the streaming is still a bit rough. The blu-ray video and audio quality was excellent! Much better than it's predecessor, a consumer-grade $250 Toshiba that was really disappointing and turned me off blu-ray.

Postscript - while the streaming is a bit rough and doesn't support all formats, plugging in an external hard drive (i used e-sata) works wonderfully. The oppo plays just about everything including ape, dts, mkv, flac etc - it does all the things you want (which windows media center will not) and the sound quality is excellent - much better than the same track streamed from the media server. I couldn't believe it but they sound so much better non-streamed. Compression perhaps? Anyway, i think the search for the media center is over. So i shutdown the windows 7 media server, the mac pro connect 360 media server and the windows xp Tversity media server. They all worked, some better than others but none were universal. The oppo comes closest so i'm going to use the external hard disk option. This presents a few problems - how do you get the new stuff onto the external disk? The current solution is very low tech - new stuff goes to a folder and once a week unplug the external from upstairs and bring it downstairs and copy over the new stuff. Buy an Oppo-93, the almost universal machine.