Friday, May 29, 2009

Audacity on a USB string...

Tips for Using Audacity

The open source Audacity audio editing program is not installed on the lab computers so editing audio there is impossible...right? Actually, not a problem as our portable app environment (explained in a previous post) can run Audacity.

Install

First off we go to the portable apps web site at http://portableapps.com/apps and under the Music/Video category we download Audacity. This is version 1.2.6 which is not the most current version but it will do. The installation is the same as with any other portable app - select Options, Install a New App from the menu and browse to where you downloaded the audacity.paf.exe file

Once the install is finished you can select Audacity from the menu to run it.

Preferences

The first thing to do is to set up your preferences. Since you are running from a USB stick it is likely the computer hardware you are currently on is different from the computer you were on yesterday and will be on tomorrow. This means you may have to:

  • configure windows for the correct sound settings
  • configure Audacity for the current hardware
First thing is to ensure Windows is working, particularly if you are using a headset for listening or a microphone for recording. If you have a USB headset/mic combo it should install itself. I used a logitech and it was automatically detected by XP.

  1. Right click on the Sound icon on the windows taskbar
  2. Select Open Volume Control
  3. Ensure that the MUTE ALL box is not ticked with a checkmark.
It is common for lab computers to mute the sound so as not to disturb other students.

  1. Now right click on the sound icon again
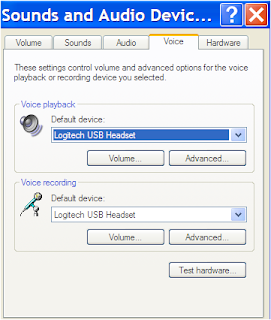
  2. Select Adjust Audio Properties
  3. Click the Audio tab
  4. Change the Default Device for recording and sound playback
  5. Choose Realtek when using a standalone mic or headset with audio jacks
  6. Choose Logitech or other vendor when using a USB mic/headset

This should be all you need to do in Windows but it is possible your microphone is not optimally configured for this computer. It is common for the microphone input to be muted or to have the volume turned down.

  1. Click the Voice tab
  2. Under Voice Recording click the Volume tab
  3. Move the mic sliders to the top. If this results in a 'too loud' microphone input you can always decrease the volume of the mic in Audacity. The Advanced tab also contains a mic boost option if the input is still low
  4. Close the dialog Box

If you wish to test out the microphone you can click the TEST HARDWARE button which launches a wizard to help calibrate the sound level of your mic.

Audacity Preferences

In Audacity select the Preferences menu (in windows this is under Edit, Preferences on a mac it is under Audacity,Preferences)
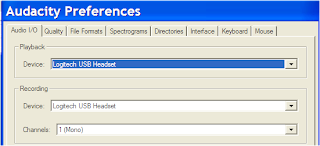
  1. Click the Audio I/O tab
  2. Under Playback select Realtek as the device unless you are using a USB headset/mic. In that case, choose Logitech USB or whatever the vendor is
  3. Under Recording select Realtek as the device unless you are using a USB headset/mic. In that case, choose Logitech USB or whatever the vendor is

The last step is to set up the export to MP3 function. Since Audacity is open-source and the MP3 code is proprietaty it cannot be included with the download. So you have to do some seperate steps.

MP3 and LAME

First off we need to get the MP3 library:
  1. Goto http://www.free-codecs.com/download/Lame_Encoder.htm
  2. Click on download LANE encoder
  3. Download the lame3.98.2.zip file
  4. Extract from the archive the file lame_enc.dll
  5. Copy it to your USB stick in the PortableApps/AudacityPortable folder
Now you can tell Audacity when the MP3 library is located.

Select Preferences, File Formats
Under MP3 Export File Setup click FIND LIBRARY and click YES
Browse to your USB Stick and PortableApps/AudacityPortable
Select lame_enc.dll and click OPEN

Note that the default bit rate for exporting is set at 128bps which is suitable for portable MP3 players. For CD quality exports change this to 192-256 bps and for Podcasts change it to 64pbs.

You can now import and edit audio and export it as an MP3 file.

Tuesday, May 12, 2009

Blort

Sausage Blort

This is non-technical but useful. A blort is defined as a one pot dish that can be stored in the fridge and eaten on consecutive days, improving in flavour each day. Favored by grad students, single parents etc

A common blort involves cream corn, hamburger and potatoes, another uses ham, eggs, cheese, peppers but today we are making sausage blort. This requires good sausage - a nice spicy italian works well.

Take a big heavy saucepan, i use a ancient cast iron one. I have used a wok for this but with a light pan the heat may not be even and the rice on the sides ends up hard
On medium heat add some olive oil and then some chopped garlic and onion
Take two freshly made sausages from a good butcher (bob on the corner makes really good sausage) and squeeze the meat out of casing and drop into the pan in chunks - just like cookie dough
brown up the sausage and add lots of freshly ground pepper and some red wine if you have it
add a tin of tomatoes - i like the alymer italian spiced tomatoes
add half a cup of rice, i prefer basmati
add half a tin of water
increase heat and bring to a boil
put on the lid and reduce heat so as to steam the rice and render away the liquid
cook for about 20-30 minutes until the water is gone and the rice is soft
serve with dark bread and red wine or lighter bread and dark beer - i like festbock with it
serves 2 hearty people or 1 person with lots left over for the next day

Tuesday, May 5, 2009

Installing Audacity on Windows

Installing Audacity

We were using the G5 to play with some audio and we needed a quick editor/converter so we thought of installing Audacity as we have it on Megatron, the dual xeon running ubuntu 9.04. So off we went to http://audacity.sourceforge.net/download/mac to get the osx binary.

Since the G5 is non-intel machine the version is older - only 1.2.6 but we go ahead anyway. The install is the usual, mount the DMG and drag to an Audacity folder in the applications directory. However, we forgot about the Mp3 licensing problem which means you can't export to Mp3 without installing the LAME library. It took a little while to find the library, which was in the pkg format and to download and run the installer.

This is where it gets stupid - the default install is to the sys drive to a lib folder in the usr tree. If you are unfamiliar with those directories it is because they are hidden by default. No problem, except when you run Audacity and go to export it asks you to browse to the folder containing the LAME library - except you can't because they are hidden folders. Years ago with 10.2 i used a utility to turn on/off the hidden files because you always needed to fool around with them as many programs were still X11 instead of native osx. But that was years ago and i never bothered to install X11 wityh 10.5 anyway. Rather than go backward i decide to re-install the library but rather than accept the defaults, to do a custom install to applications/audacity so i could indicate the path of the LAME library to Audacity. Smooth move? Nope - while i can browse to the library location ok, audacity complains that the LAME file is not the correct one. OK so we give up as we are in a hurry and move the audio over to Megatron and do the conversion in a minute as it has both LAME and FFmpeg installed. However, since most of the students will be stuck in windows world maybe we should install Audacity for win xp and write up how it is done.

The problem is the lamelib download has a file called libmp3lame.dylib but that audacity does not like this file and gives an error message "could not open mp3 encoding library". We finally find a lamelib-carbon file but it is in the old stuffit format so now we need to download and install an unstuffit for osx. We discover the open source 'The Unarchiver 1.6.1'. Skip to end...


Audacity in Windows

We download 1.2.6 (which lags behind the linux version) installer and the LAME MP3 encoder (libmp3lame-win-3.98.2.zip) library. Might as well get ffmpeg while we are here. Audacity installs itselft into program files\audacity and we then run LAME which installs itselft into program files\lame for audacity. FFmpeg behaves the same.

We run Audacity and load a wav file. Now to convert and save it as an MP3 file.

  1. Select File, Export as MP3 from the menu
  2. Choose a location and click SAVE
  3. A dialog box asks 'Would you like to locate lame_enc_dll now?. Click YES
  4. Browse to C:\program files\lame for audacity
  5. Select lame_enc.dll and click OPEN
  6. Fill in the metadata and click OK

You now have an Mp3 file. The next test is to record some audio. We have a number of options:

- 'gooseneck' dynamic cardioid desktop microphone
- hand held singer dynamic cardioid mic
- several cheap computer mics
- a headset

First let's check out the sound hardware and software. We goto the sound control panel properties in windows and click on TEST Hardware. The first headset mic is not detected by the wizard. Probably because there is no microphone shown in the volume control.

  1. We select Volume Control
  2. Select Options, Properties from the menu
  3. Place a tick mark in the Microphone box
  4. The microphone settings are set to mute by default, we untick the mute
  5. Click ADVANCED under the microphone and tick the Mic Boost option

After closing the volume control panel we select Adjust Audio Properties from the taskbar and click on the Voice tab. Now we click Test Hardware again. Eventually the wizard displays a paragraph of text to read.

Now we run audacity and record our sound sample by plugging in a mic and pressing the red record button.

What we should do now is fix the audacity on the mac. Ok now that we have found the correct lame library and a program that handles the stuffit format we are in business.

We install The Unarchiver and set it to handle all archives and then unpack the .sit file and extract lamelib and stick it in audacity. We then select File, Export in Audacity and point it to the location of the file and viola! success at last. We can now export mp3 on the mac, more difficult that it should be but we are there.

The next question is - can we drag the audacity folder to the lab macs and run it? This would solve a lot of problems as students could use the same tool everywhere and anytime. There is also a portable audacity - we would need to test out the osx version of portable apps but i wonder about the utility of editing sound files with it - of course if the file is on the hard drive just the app is running off the stick and it is pretty much all in ram anyway.