The open source Audacity audio editing program is not installed on the lab computers so editing audio there is impossible...right? Actually, not a problem as our portable app environment (explained in a previous post) can run Audacity.
Install
First off we go to the portable apps web site at http://portableapps.com/apps and under the Music/Video category we download Audacity. This is version 1.2.6 which is not the most current version but it will do. The installation is the same as with any other portable app - select Options, Install a New App from the menu and browse to where you downloaded the audacity.paf.exe file
Once the install is finished you can select Audacity from the menu to run it.
Preferences
The first thing to do is to set up your preferences. Since you are running from a USB stick it is likely the computer hardware you are currently on is different from the computer you were on yesterday and will be on tomorrow. This means you may have to:
- configure windows for the correct sound settings
- configure Audacity for the current hardware
- Right click on the Sound icon on the windows taskbar
- Select Open Volume Control
- Ensure that the MUTE ALL box is not ticked with a checkmark.
- Now right click on the sound icon again
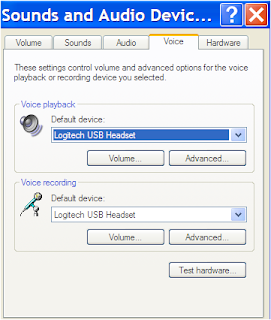
- Select Adjust Audio Properties
- Click the Audio tab
- Change the Default Device for recording and sound playback
- Choose Realtek when using a standalone mic or headset with audio jacks
- Choose Logitech or other vendor when using a USB mic/headset
This should be all you need to do in Windows but it is possible your microphone is not optimally configured for this computer. It is com
 mon for the microphone input to be muted or to have the volume turned down.
- Click the Voice tab
- Under Voice Recording click the Volume tab
- Move the mic sliders to the top. If this results in a 'too loud' microphone input you can always decrease the volume of the mic in Audacity. The Advanced tab also contains a mic boost option if the input is still low
- Close the dialog Box
If you wish to test out the microphone you can click the TEST HARDWARE button which launches a wizard to help calibrate the sound level of your mic.
Audacity Preferences
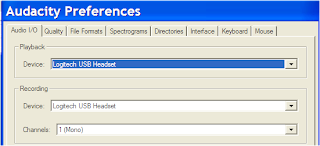
In Audacity select the Preferences menu (in windows this is under Edit, Preferences on a mac it is under Audacity,Preferences)

- Click the Audio I/O tab
- Under Playback select Realtek as the device unless you are using a USB headset/mic. In that case, choose Logitech USB or whatever the vendor is
- Under Recording select Realtek as the device unless you are using a USB headset/mic. In that case, choose Logitech USB or whatever the vendor is
The last step is to set up the export to MP3 function. Since Audacity is open-source and the MP3 code is proprietaty it cannot be included with the download. So you have to do some seperate steps.
MP3 and LAME
First off we need to get the MP3 library:
- Goto http://www.free-codecs.com/download/Lame_Encoder.htm
- Click on download LANE encoder
- Download the lame3.98.2.zip file
- Extract from the archive the file lame_enc.dll
- Copy it to your USB stick in the PortableApps/AudacityPortable folder
Select Preferences, File Formats
Under MP3 Export File Setup click FIND LIBRARY and click YES
Browse to your USB Stick and PortableApps/AudacityPortable
Select lame_enc.dll and click OPEN
Note that the default bit rate for exporting is set at 128bps which is suitable for portable MP3 players. For CD quality exports change this to 192-256 bps and for Podcasts change it to 64pbs.
You can now import and edit audio and export it as an MP3 file.

1 comment:
Only one thing i forgot to note:
Since this is a USB stick the Audacity settings have to be re-done each time you use it.
Windows - make sure the right sound devices are set up and selected
Audacity Preferences - tell it where lame_enc.dll is and what hardware devices to use for sound input/outpur
Post a Comment